Anyone who knows me, knows I love chocolate. I also love finding ways to use things I would otherwise throw out. So I’m kind of in love with this recipe for vegan chocolate mousse which, aside from being insanely good also fulfills my second love by giving me something to do with the liquid that I drain off from chickpeas/beans, otherwise known as aquafaba. This is something that was introduced to me in the last few months, and has taken me a while to actually try out myself, even though it’s been high on my list, so am happy to finally be able to share my experiences with aquafaba with you here.

I’ll be the first to admit, my first attempt at this recipe was not the most successful, but for a couple of obvious reasons that I was able to quickly correct the second time around, and now I’m completely sold. This mousse IS as good as any non-vegan recipe, and your guests will NEVER guess what they are eating.
If you have been reading about it online, you’ll probably agree that aquafaba sounds like a bit of a magical ingredient. Whether you’re using the chickpea juice that you drained off a can or are making your own from soaked beans, you’ve got to stop and recognise the very coolness of what you can do with this stuff. And it doesn’t end with chickpeas. You can do this with the brine of many beans, and even tofu water (according to what I have been reading), and your final results will NOT taste like beans (/tofu/…).
Sounds sort of crazy and sciency, yes, and as with science there is a decent margin for error, so I’m going to share my tips with you, based on my own experiences, so that hopefully you’ll be able to get it right the first time.
TIP #1 – WHIP IT, WHIP IT GOOD
Aquafaba mousse isn’t a dish you ‘just whip up’ – I had to put in a good 12-15 minutes with an electric mixer before my aquafaba really held its peaks. So even if you think you’re finished and you are seeing nice peaks form, give it another minute or so to really get a good consistency.
TIP #2 – STABILIZERS
It is totally possible to achieve nice firm peaks without using a stabilizer, but then when you add your chocolate to finish the mousse, you will find that its weight more or less takes the air out of your aquafaba, leaving you with something that is close to mousse, but is far from the nice airy chocolate mousse you are dreaming of and turns into something closer to pudding after being left to chill in the fridge.
What’s the solution? Adding 1/8 tsp of cream of tartar will help your aquafaba keep its form and is often used in meringue recipes as a stabilizer.
TIP #3 – DON’T BURN THE CHOCOLATE
Burnt chocolate tastes like…burnt chocolate! (I know – I did this with the first batch!), and burnt chocolate mousse (let alone burnt vegan chocolate mousse) is not going to leave your friends asking for seconds. So, whether you are melting the chocolate on the stove or in the microwave, if you burn it, toss it and try again.
TIP #4 – SPLURGE ON REALLY GOOD QUALITY CHOCOLATE
You can really taste the difference, so look for a chocolate that is 65-75% cocoa. Once you’ve found a good chocolate for your base, you can experiment with flavours by adding a few drops of lemon, mint, or lavender extract.
TIP #5 – CHICKPEA WATER DOESN’T LAST FOREVER
I came across a jar of aquafaba (chickpea water) in the fridge that I had saved with good intentions but then neglected to actually use. When I rediscovered it, I realised I really didn’t know how long aquafaba can be kept for in the fridge like that and looked into it further – apparently aquafaba has a fridge life of about 4 days, but can also be frozen and thawed for later use if you won’t be able to use it on time.
That was the last one. I think you’re ready to get started – let me know how you make out!
- 1 cup chickpea water (aquafaba)
- 100g high quality chocolate, melted
- 1.5 tbsp cane sugar
- ⅛ tsp cream of tartar
- (Optional) 2-3 drops of lemon extract (or another flavour of your choice, e.g. lavender, mint, vanilla)
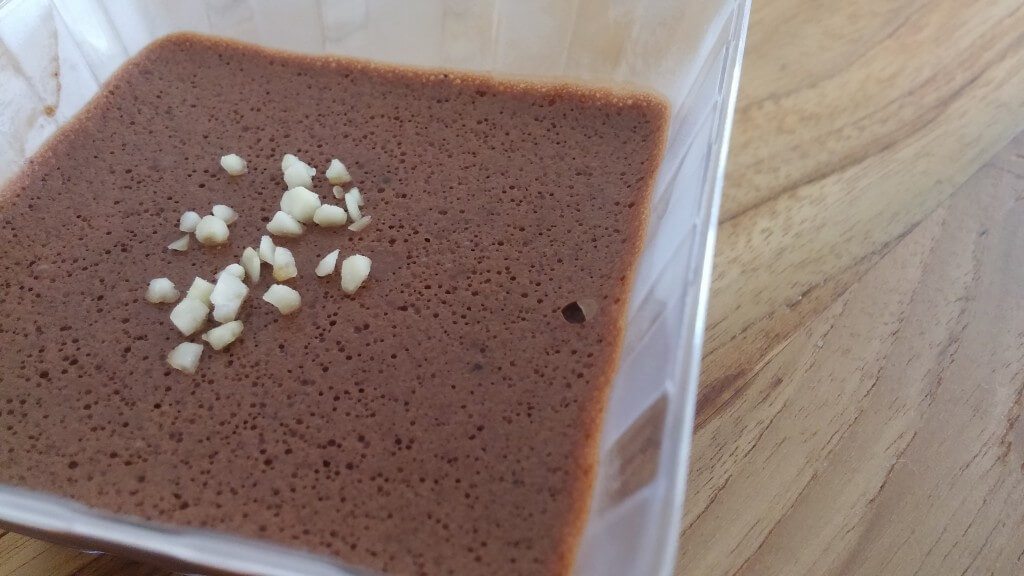
- (Optional) Shaved chocolate, fresh berries, crushed nuts, etc to top
- Melt your chocolate (on the stove or in the microwave), stir in any desired flavour extracts and set aside to cool.
- Add your aquafaba to a deep bowl or the bowl of your stand mixer and stir in the cream of tartar.
- Mix until peaks begin to form (can take anywhere between 8-15 minutes).
- Add the cane sugar and continue mixing for another 2 minutes, letting the peaks firm more. You should end up with a meringue that clings to the whisk thickly.
- Drizzle the chocolate across your aquafaba and fold it into itself until well blended.
- Spoon into your desired serving dish(es) and chill in the fridge until ready to serve.
- Top with your choice of toppings before serving.
 Welcome!


wondering whether this alone justifies a purchase of a standup mixer especially because I have zero counter space…
I am having the same dilemma! Maybe we should try to organize a group buy?
I made still peaks of the chickpea liquid but I think I should have added some liquid to the chocolate as it was not pour able. Folding it into the whipped aquafabe caused the faba to deflated. But I love the idea and will try again.
Of course I still have over 14 ounces of some yummy chocolate to dispose of, so I’m not crying in my cups of choco.
Nothing wrong with having left over chocolate!
If you find that the aquafaba totally deflates when you add the chocolate, either the chocolate is too hot (which it doesn’t sound like since you said it was hard to poor), or you didn’t really have stiff enough peaks.
There is a funny joke about whipping aquafaba, but really you should aim to be able to turn the bowl over and have it keep its shape. That way it is able to hold up against the weight of the chocolate without too much trouble. It will deflate a bit, but the cream of tartar also helps it hold its form.
Good luck! Regardless it is a yummy experiment 😀